Ashika Morasiewicz
Outdoor Adventurer from the North Shore, BC
Scramble to Mt. Ronayne (Birkenhead Area), BC.
Trip date: May 21-22, 2016.
You know there’s a May long weekend coming up when your local MEC is jam-packed with customers, loading up on camping gear and supplies, on a Wednesday evening. May long weekend holds a special place in our hearts; it sort of kicks off the camping/hiking season and, like bears, we come out of our hibernation and head outdoors to soak up the warm sun and bright blue skies over the course of not two, but THREE days. Not this weekend though, forecast showed rain, snow, overcast skies, and cool temps for most of it.
Long weekends around Vancouver can be a little problematic. In my experience, they bring crowds of people to all corners between Manning Park and Pemberton (and beyond). If weather is the slightest bit iffy, you can expect crowds at all the major huts/shelters. Based on the combo of a location the regular crowd likely hasn’t heard of, a long drive, and questionable road conditions (possible snow, downed trees, etc.), Ryan and I decided to head to the Birkenhead area to check out Mt. Ronayne.
We hiked Mt. Ronayne via a modified version of the ‘Corkscrew Route’. From the head of the Tenas Creek valley, we continued up the main drainage on the west side of Ronayne, curved back south to cross a high col in the alpine, and continued up the southern ridge to the summit block. The standard Corkscrew goes from the col to the south bowl, along the east ridge and gains the summit from there.
Stats


Ours:
Distance: 15.6km
Elevation gain: 1363m
Trail type: There-and-back
Actual:
Distance: 13.4km
Elevation gain: 1108m
Trail type: There-and-back
Access
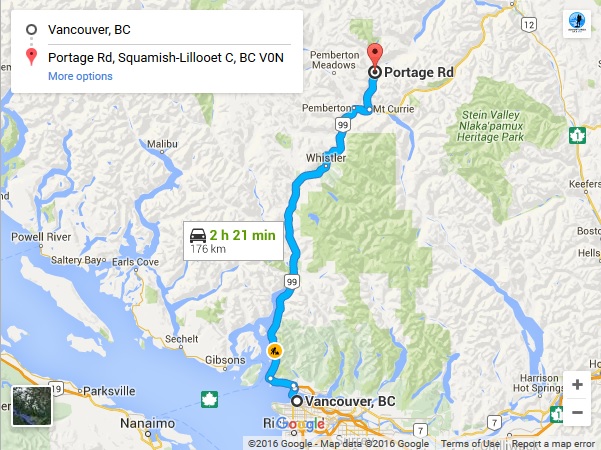
From Vancouver, Google Maps will get you to the Birkenhead area. Past Birkenhead, it’s not very accurate.
- Take Highway 99 north through Pemberton to Mt. Currie.
- Continue north on Portage Road (towards D’Arcy) for ~16.5km.
- Turn left onto Birkenhead Lake FSR. (NOTE: the start of this road is called Old Portage Road.)
- Continue ~9.8km and turn left on to the North Tenas Branch. (NOTE: this branch is unsigned. It is immediately after the second bridge over the river. You do not want the branch signed as Tenas Creek, which is a few kilometers further back.)
- Drive as far up the North Tenas branch as your vehicle will allow.
Road conditions: Some sections of the Birkenhead Lake FSR are loose gravel, somewhat washboard-ish, and potholed. Birkenhead Lake FSR is 2WDable. There are not nearly as many water bars on the North Tenas branch as there were in previous years, but the existing bars are fairly deep. A high clearance 4WD is recommended. Other than that, the road is in fabulous shape and driveable to its end.
The Hike
We left Vancouver early on Saturday morning and set off for Mt. Ronayne. The drive up was uneventful. After about 3.5 hours on the road, we reached the North Tenas branch turnoff; if you read the ‘Access’ bit above, you’ll have read the road is in fabulous shape and driveable to the end – and is no longer a “water bar hell” – Ryan’s words.
A downed tree stopped us about 200m short of the final cutblock (the one that provides access to the Sun God/Seven O’Clock via Matt Gun’s route). This tree was cut and removed by ATVers sometime during our trip; you are now able to drive all the way to the end of the road.
We parked the truck, gathered our things, and continued up the road. The snow began about 50m from the end of the cutblock; some sections were rotten and we had to step carefully to avoid post-holing through. At the end of the cutblock, we picked up on the well flagged and tracked snowmobile trail heading further into the valley.


In about 500m, we reached the open slopes below the northern flank of Ronayne. This is where the snowmobile track crossed Tenas Creek. The spring melt had the creek running high and fast and the crossing looked to involve a somewhat sketchy looking knee-deep wade. We bushwhacked a few hundred meters upstream to where the avalanches off of Ronayne’s Y-couloir had created enough of a snow-bridge to cross safely.

From the south side of the creek, we traversed across the avy debris and climbed a steep slope to access the side valley to the west of Ronayne. There was still plenty of snow covering the ground and we were able to make good time up the valley on soft/supportable snow.


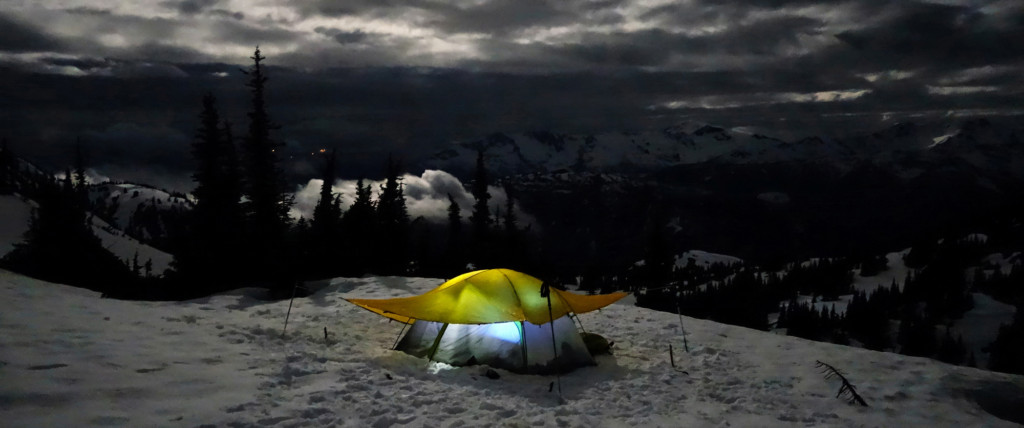
Near the top of the valley, we turned left (east) and climbed the slopes which provided access to the southern flank of the summit. Here, we found a good tent spot with nice views to the south, some protection from the wind, and running water from a nearby streamlet.

We dropped our overnight gear and continued uphill onto Ronayne’s southern ridge. Broad snowfields allowed us to switchback up the ridge and lead us up a small bluff. The final summit scramble came into view.


By the time we reached the scramble, we were feeling pretty exhausted from the effort of carrying heavy overnight packs most of the way up. We looked at each other and, giving up too easily, decided it wasn’t in the cards for this trip.
We made our way back to our gear cache and set up our tent and cooked dinner. We had little else to do that evening and made it to bed by 7pm for a solid night’s sleep – minus the 2am wake up for some night shots.


The next morning, we were up around 8am. I felt well rested and long story short, we decided to head up the summit again. This time, the staircase of steps up the snow slopes allowed for quick travel along the southern ridge. Just as we finished packing up our camp, a sucker hole appeared, lighting the way. This was the only sun we saw for the rest of the day.


Soon, we were at the base of Ronayne’s summit block again. With a closer look, it appeared significantly easier than it had the day before (funny how a little bit of rest can warp how you see things). From our view, we saw numerous small ramps and blocky holds; we headed up with no difficulty.


There were strong winds on the summit as we topped out. Ryan worked to rebuild the cairn as I watched the clouds blowing in and out and ultimately obscuring our views for the rest of the day. The break in the clouds was long enough to take in some views of the nearby mountains.


We didn’t linger too long and retraced our steps back to our camp site. We packed up and headed back for the truck.


Our descent was slowed down due to low-trending blood sugars. I stopped frequently to eat copious amounts of carbs and Gatorade powder to nip the trend. I don’t always have low blood sugars in the mountains, but when I do, I have a sh!t ton of insulin on board (see Diabetes Management section for more info).
When we made it back to the road, Ryan was just mentioning how we would have to watch out for the rotten snow when his left leg punched through, hip-deep, and he wasn’t touching the bottom. We walked off the road and onto the swampy, but snow-free, cutblock. We were able to rejoin the snow-free portion of the road a bit lower down and had a mellow walk back to the truck.
On the drive back, along North Tenas branch, we noticed a fresh pile of bear scat on the middle of the road. A few minutes later we spotted a healthy looking black bear higher up in the next cutblock. This was the only soul we encountered all weekend.
Diabetes Management
Blood sugar management was great throughout the course of our first day. We made quick progress, took short and infrequent rest breaks, and made quick work of the route up.
As usual, I started the hike with a 50% basal reduction. I ate 15-20g of carbs every 45 minutes to 1 hour throughout the day and felt great. My blood sugars were level with the odd high and low trend, but consistently within the normal range.
On the second day, however, things went a little sideways. I had one bad spike almost immediately after summiting; the only cause I can think of is adrenaline? I took some insulin to correct the spike and we started making our way back. I didn’t reduce my basal because I rarely do when there’s only downhill left on a trip. After continuously low trends (I mean the double arrow down on my Animas Vibe pump & CGM), we started taking extended breaks so I could eat and give myself enough time to avoid a low. Unfortunately, for the rest of the day, my blood sugars stayed low. I shut off my basal and stopped to eat every 30-40 minutes on the way down. The lowest my sugars showed (based on a manual bg check) was 4.3mmol – not bad at all to see on the screen, but a little alarming with the down arrow trends after having eaten ~300g of carbs.
We kept taking breaks and ate tons of gels and snacks until we reached the truck. The best thing I had to raise my sugars was gatorade powder. It dissolved quickly under my tongue, it didn’t make me feel sick, and it didn’t cause any bad spikes as far as I could tell.
Pack List
The 10+6 essentials
Rain gear
Overnight gear (tent, sleeping bag, thermarest)
Overnight layers
Freeze-dried meals and snacks
Hiking boots
Gaitors
Crampons & ice axe (these were not needed)
Camera & Tripod
We’ll be back here for more views and different vantage points. Sun God and Seven O’Clock are on the list, as is the Tenquille-Owl traverse.
We’ve stretched out our legs and put some thought into our plans this summer. The season of lakes, high alpine, and sunshine is upon us. Happy trails, all!
– Ash
Nice to see both of you back in the mountains again.
Thanks Ron! Any plans for the summer?
I’ll probably just hike/backpack around Strathcona Park. Sometime in the future (don’t know when), I would like to get back to the Valhalla Mountains and do a west-east traverse in southern Valhalla Park which will involve route finding; it’s an amazing area but quite remote.
Looking forward to seeing the pics. Not sure if we’ll head to the island for hiking this summer, but I’d love to see Strathcona.